Showing posts with label Web Solutions. Show all posts

Thursday, 16 March 2017

Integrating Jenkins build results into JIRA issues

Anonymous

After linking Subversion (or Git) with JIRA, the build server looks like a worthwhile target too. Aim of the JIRA integration for Jenkins is to link JIRA issues with the resulting build artifact and to answer the question “Which build contains the bug fix for issue 1234?”. The Jenkins JIRA plugin therefore updates the JIRA issue by adding a comment containing a link to the generated build artifact.
The JIRA Plugin requires Jenkins, sadly it does not work with Hudson any more (this includes the latest Eclipse Hudson 3.0 milestone 2 release). It is possible to install the JIRA plugin in Hudson, even to configure it. However, including JIRA as post build action results into a java.lang.NoSuchMethodError: hudson.scm.ChangeLogSet$Entry.getCommitId()Ljava/lang/String; exception and a failed build.
Installation and initial configuration
Installation is simple: Open the Plugin Manager, install the JIRA Plugin and restart Jenkins:
The following initial configuration must be done only once on the Manage System page, in a corporate environment supposedly by a Jenkins administrator. Add a new JIRA configuration and provide the URL to your issue tracker, as well as username and the password. This user requires write access to all projects using the Jenkins JIRA integration. Since the username will show up as comment author, a service user like jenkins_ci or something similar makes it easier understandable where those comments are coming from. Finally, check the Record Scm changes checkbox and save your changes.

In case a certificate exception like sun.security.validator.ValidatorException: PKIX path building failed: sun.security.provider.certpath.SunCertPathBuilderException: unable to find valid certification path to requested target shows up at the URL textfield, Jenkins doesn’t find or recognize the JIRA server certificate (especially if it is a self-generated one). Simply obtain this certificate and import it using the Java keytool (replace [jira-domain] with your domain name):
keytool -import -alias [jira-domain] -keystore $JAVA_HOME/jre/lib/security/cacerts -file file.cer
The JDK (or JRE) entered for the keystore must be the one configured for Tomcat. You have to use this keystore (Linux requires usage of the sudo command)! Password of the global cacerts keystore should be changeit. Jenkins (Tomcat) needs to be restarted after the import. In case the exception is still there, either the imported certificate was not the correct one, the alias is not correct or the given Java path is not the Java installation used by Tomcat.
Individual project configuration
Now every project can use the JIRA integration. First of all, create your JIRA project and your SVN (or Git) repository as usual. Then start a new Jenkins build or modify an existing one. Set up all required build steps as usual.
Each project must enable the JIRA Jenkins connection individually. This requires write access for the Jenkins service user to your JIRA project. This user will update the corresponding issues with a comment after a build.

After this initial organizational task and the basic project setup, the projects Post-build Actions in its build configuration must be updated by selecting Update relevant JIRA issues. No additional JIRA configuration is required here. But it may make sense to periodically poll the SCM by configuring a schedule (like every couple of minutes). Otherwise you’ll have to start the build manually.


Day to day project usage
There are no special tasks or steps required to take advantage of the Jenkins JIRA integration. The only requirement is, that a SVN/Git commit contains the JIRA issue ID in the commit message (e.g. as it is done automatically by Eclipse Mylyn with an active task). Every new commit included in a new build will be searched for JIRA issue IDs. Each issue will contain the same comment created by the Jenkins JIRA plugin pointing to the generated artifact.

Thursday, 9 March 2017

HTTP Status Codes Cheat Sheet and ERROR CODES

Harry


HTTP Status Codes

Name Value
100 Continue
101 Switching Protocols
102 Processing
200 OK
201 Created
202 Accepted
203 Non-Authoritative Information
204 No Content
205 Reset Content
206 Partial Content
207 Multi-Status
208 Already Reported
226 IM Used
300 Multiple Choices
301 Moved Permanently
302 Found
303 See Other
304 Not Modified
305 Use Proxy
307 Temporary Redirect
308 Permanent Redirect
400 Bad Request
401 Unauthorized
402 Payment Required
403 Forbidden
404 Not Found
405 Method Not Allowed
406 Not Acceptable
407 Proxy Authentication Required
408 Request Timeout
409 Conflict
410 Gone
411 Length Required
412 Precondition Failed
413 Payload Too Large
414 URI Too Long
415 Unsupported Media Type
416 Range Not Satisfiable
417 Expectation Failed
418 I’m a teapot
421 Misdirected Request
422 Unprocessable Entity
423 Locked
424 Failed Dependency
425 Unordered Collection
426 Upgrade Required
428 Precondition Required
429 Too Many Requests
431 Request Header Fields Too Large
451 Unavailable For Legal Reasons
500 Internal Server Error
501 Not Implemented
502 Bad Gateway
503 Service Unavailable
504 Gateway Timeout
505 HTTP Version Not Supported
506 Variant Also Negotiates
507 Insufficient Storage
508 Loop Detected
509 Bandwidth Limit Exceeded
510 Not Extended
511 Network Authentication Required

Tuesday, 7 March 2017

Schedule Tasks on Linux Using Crontab

Anonymous
If you've got a website that's heavy on your web server, you might want to run some processes like generating thumbnails or enriching data in the background. This way it can not interfere with the user interface. Linux has a great program for this called cron. It allows tasks to be automatically run in the background at regular intervals. You could also use it to automatically create backups, synchronize files, schedule updates, and much more. Welcome to the wonderful world of crontab.

Crontab

The crontab (cron derives from chronos, Greek for time; tab stands for table) command, found in Unix and Unix-like operating systems, is used to schedule commands to be executed periodically. To see what crontabs are currently running on your system, you can open a terminal and run:
$ sudo crontab -l
To edit the list of cronjobs you can run:
$ sudo crontab -e
This wil open a the default editor (could be vi or pico, if you want you can change the default editor) to let us manipulate the crontab. If you save and exit the editor, all your cronjobs are saved into crontab. Cronjobs are written in the following format:
* * * * * /bin/execute/this/script.sh

Scheduling explained

As you can see there are 5 stars. The stars represent different date parts in the following order:
  • minute (from 0 to 59)
  • hour (from 0 to 23)
  • day of month (from 1 to 31)
  • month (from 1 to 12)
  • day of week (from 0 to 6) (0=Sunday)

Execute every minute

If you leave the star, or asterisk, it means every. Maybe that's a bit unclear. Let's use the the previous example again:
* * * * * /bin/execute/this/script.sh
They are all still asterisks! So this means execute /bin/execute/this/script.sh:
  • every minute
  • of every hour
  • of every day of the month
  • of every month
  • and every day in the week.
In short: This script is being executed every minute. Without exception.

Execute every Friday 1AM

So if we want to schedule the script to run at 1AM every Friday, we would need the following cronjob:
0 1 * * 5 /bin/execute/this/script.sh
Get it? The script is now being executed when the system clock hits:
  • minute: 0
  • of hour: 1
  • of day of month: * (every day of month)
  • of month: * (every month)
  • and weekday: 5 (=Friday)

Execute on workdays 1AM

So if we want to schedule the script to Monday till Friday at 1 AM, we would need the following cronjob:
0 1 * * 1-5 /bin/execute/this/script.sh
Get it? The script is now being executed when the system clock hits:
  • minute: 0
  • of hour: 1
  • of day of month: * (every day of month)
  • of month: * (every month)
  • and weekday: 1-5 (=Monday til Friday)

Execute 10 past after every hour on the 1st of every month

Here's another one, just for practicing
10 * 1 * * /bin/execute/this/script.sh
Fair enough, it takes some getting used to, but it offers great flexibility.

Neat scheduling tricks

What if you'd want to run something every 10 minutes? Well you could do this:
0,10,20,30,40,50 * * * * /bin/execute/this/script.sh
But crontab allows you to do this as well:
*/10 * * * * /bin/execute/this/script.sh
Which will do exactly the same. Can you do the the math? ; )

Special words

For the first (minute) field, you can also put in a keyword instead of a number:
@reboot     Run once, at startup
@yearly     Run once  a year     "0 0 1 1 *"
@annually   (same as  @yearly)
@monthly    Run once  a month    "0 0 1 * *"
@weekly     Run once  a week     "0 0 * * 0"
@daily      Run once  a day      "0 0 * * *"
@midnight   (same as  @daily)
@hourly     Run once  an hour    "0 * * * *"
Leaving the rest of the fields empty, this would be valid:
@daily /bin/execute/this/script.sh

Storing the crontab output

By default cron saves the output of /bin/execute/this/script.sh in the user's mailbox (root in this case). But it's prettier if the output is saved in a separate logfile. Here's how:
*/10 * * * * /bin/execute/this/script.sh >> /var/log/script_output.log 2>&1

Explained

Linux can report on different levels. There's standard output (STDOUT) and standard errors (STDERR). STDOUT is marked 1, STDERR is marked 2. So the following statement tells Linux to store STDERR in STDOUT as well, creating one datastream for messages & errors:
2>&1
Now that we have 1 output stream, we can pour it into a file. Where > will overwrite the file, >> will append to the file. In this case we'd like to to append:
>> /var/log/script_output.log

Mailing the crontab output

By default cron saves the output in the user's mailbox (root in this case) on the local system. But you can also configure crontab to forward all output to a real email address by starting your crontab with the following line:
MAILTO="yourname@yourdomain.com"

Mailing the crontab output of just one cronjob

If you'd rather receive only one cronjob's output in your mail, make sure this package is installed:
$ aptitude install mailx
And change the cronjob like this:
*/10 * * * * /bin/execute/this/script.sh 2>&1 | mail -s "Cronjob ouput" yourname@yourdomain.com

Trashing the crontab output

Now that's easy:
*/10 * * * * /bin/execute/this/script.sh > /dev/null 2>&1
Just pipe all the output to the null device, also known as the black hole. On Unix-like operating systems, /dev/null is a special file that discards all data written to it.

Caveats

Many scripts are tested in a Bash environment with the PATH variable set. This way it's possible your scripts work in your shell, but when run from cron (where the PATH variable is different), the script cannot find referenced executables, and fails.
It's not the job of the script to set PATH, it's the responsibility of the caller, so it can help to echo $PATH, and put PATH=<the result> at the top of your cron files (right below MAILTO).

Tuesday, 14 February 2017

Configure PXE Server In Ubuntu 14.04

Anonymous
To get started, you need to first set up your PXE server to use a static IP. To set up a static IP address in your system, you need to edit the “/etc/network/interfaces” file.
1. Open the “/etc/network/interfaces” file.
sudo nano /etc/network/interfaces
Add/edit as described below:
# The loopback network interface
auto lo
iface lo inet loopback
# The primary network interface
auto eth0
iface eth0 inet static
address 192.168.1.20
netmask 255.255.255.0
gateway 192.168.1.1
dns-nameservers 8.8.8.8
Save the file and exit. This will set its IP address to “192.168.1.20”. Restart the network service.
sudo /etc/init.d/networking restart
DHCP, TFTP and NFS are essential components for configuring a PXE server. First you need to update your system and install all necessary packages.
For this, run the following commands:
sudo apt-get update
sudo apt-get install isc-dhcp-Server inetutils-inetd tftpd-hpa syslinux nfs-kernel-Server
DHCP stands for Dynamic Host Configuration Protocol, and it is used mainly for dynamically distributing network configuration parameters such as IP addresses for interfaces and services. A DHCP server in PXE environment allow clients to request and receive an IP address automatically to gain access to the network servers.
1. Edit the “/etc/default/dhcp3-server” file.
sudo nano /etc/default/dhcp3-server
Add/edit as described below:
INTERFACES="eth0"
Save (Ctrl + o) and exit (Ctrl + x) the file.
2. Edit the “/etc/dhcp3/dhcpd.conf” file:
sudo nano /etc/dhcp/dhcpd.conf
Add/edit as described below:
default-lease-time 600;
max-lease-time 7200;
subnet 192.168.1.0 netmask 255.255.255.0 {
range 192.168.1.21 192.168.1.240;
option subnet-mask 255.255.255.0;
option routers 192.168.1.20;
option broadcast-address 192.168.1.255;
filename "pxelinux.0";
next-Server 192.168.1.20;
}
Save the file and exit.
3. Start the DHCP service.
sudo /etc/init.d/isc-dhcp-server start
TFTP is a file-transfer protocol which is similar to FTP. It is used where user authentication and directory visibility are not required. The TFTP server is always listening for PXE clients on the network. When it detects any network PXE client asking for PXE services, then it provides a network package that contains the boot menu.
1. To configure TFTP, edit the “/etc/inetd.conf” file.
sudo nano /etc/inetd.conf
Add/edit as described below:
tftp dgram udp wait root /usr/sbin/in.tftpd /usr/sbin/in.tftpd -s /var/lib/tftpboot
Save and exit the file.
2. Edit the “/etc/default/tftpd-hpa” file.
sudo nano /etc/default/tftpd-hpa
Add/edit as described below:
TFTP_USERNAME="tftp"
TFTP_DIRECTORY="/var/lib/tftpboot"
TFTP_ADDRESS="[:0.0.0.0:]:69"
TFTP_OPTIONS="--secure"
RUN_DAEMON="yes"
OPTIONS="-l -s /var/lib/tftpboot"
Save and exit the file.
3. Enable boot service for inetd to automatically start after every system reboot and start tftpd service.
sudo update-inetd --enable BOOT
sudo service tftpd-hpa start
4. Check status.
sudo netstat -lu
It will show the following output:
Proto Recv-Q Send-Q Local Address Foreign Address State
udp 0 0 *:tftp *:*
Now you need the PXE boot file “pxelinux.0” to be present in the TFTP root directory. Make a directory structure for TFTP, and copy all the bootloader files provided by syslinux from the “/usr/lib/syslinux/” to the “/var/lib/tftpboot/” path by issuing the following commands:
sudo mkdir /var/lib/tftpboot
sudo mkdir /var/lib/tftpboot/pxelinux.cfg
sudo mkdir -p /var/lib/tftpboot/Ubuntu/14.04/amd64/
sudo cp /usr/lib/syslinux/vesamenu.c32 /var/lib/tftpboot/
sudo cp /usr/lib/syslinux/pxelinux.0 /var/lib/tftpboot/
Set up PXELINUX configuration file
The PXE configuration file defines the boot menu displayed to the PXE client when it boots up and contacts the TFTP server. By default, when a PXE client boots up, it will use its own MAC address to specify which configuration file to read, so we need to create that default file that contains the list of kernels which are available to boot.
Edit the PXE Server configuration file with valid installation options.
To edit “/var/lib/tftpboot/pxelinux.cfg/default,”
sudo nano /var/lib/tftpboot/pxelinux.cfg/default
Add/edit as described below:
DEFAULT vesamenu.c32
TIMEOUT 100
PROMPT 0
MENU INCLUDE pxelinux.cfg/PXE.conf
NOESCAPE 1
LABEL Try Ubuntu 14.04 Desktop
MENU LABEL Try Ubuntu 14.04 Desktop
kernel Ubuntu/vmlinuz
append boot=casper netboot=nfs nfsroot=192.168.1.20:/var/lib/tftpboot/Ubuntu/14.04/amd64
initrd=Ubuntu/initrd.lz quiet splash
ENDTEXT
LABEL Install Ubuntu 14.04 Desktop
MENU LABEL Install Ubuntu 14.04 Desktop
kernel Ubuntu/vmlinuz
append boot=casper automatic-ubiquity netboot=nfs nfsroot=192.168.1.20:/var/lib/tftpboot/Ubuntu/14.04/amd64
initrd=Ubuntu/initrd.lz quiet splash
ENDTEXT
Save and exit the file.
Edit the “/var/lib/tftpboot/pxelinux.cfg/pxe.conf” file.
sudo nano /var/lib/tftpboot/pxelinux.cfg/pxe.conf
Add/edit as described below:
MENU TITLE PXE Server
NOESCAPE 1
ALLOWOPTIONS 1
PROMPT 0
MENU WIDTH 80
MENU ROWS 14
MENU TABMSGROW 24
MENU MARGIN 10
MENU COLOR border 30;44 #ffffffff #00000000 std
Save and exit the file.
For this, Ubuntu kernel and initrd files are required. To get those files, you need the Ubuntu 14.04 Desktop ISO Image. You can download the Ubuntu 14.04 ISO image in the /mnt folder by issuing the following command:
sudo cd /mnt
sudo wget http://releases.ubuntu.com/14.04/ubuntu-14.04.3-desktop-amd64.iso
Note: the download URL might change as the ISO image is updated. Check out this website for the latest download link if the above URL is not working.
Mount the ISO file, and copy all the files to the TFTP folder by issuing the following commands:
sudo mount -o loop /mnt/ubuntu-14.04.3-desktop-amd64.iso /media/
sudo cp -r /media/* /var/lib/tftpboot/Ubuntu/14.04/amd64/
sudo cp -r /media/.disk /var/lib/tftpboot/Ubuntu/14.04/amd64/
sudo cp /media/casper/initrd.lz /media/casper/vmlinuz /var/lib/tftpboot/Ubuntu/
Now you need to setup Installation Source Mirrors via NFS protocol. You can also use http and ftp for Installation Source Mirrors. Here I have used NFS to export ISO contents.
To configure the NFS server, you need to edit the “/etc/exports” file.
sudo nano /etc/exports
Add/edit as described below:
/var/lib/tftpboot/Ubuntu/14.04/amd64 *(ro,async,no_root_squash,no_subtree_check)
Save and exit the file. For the changes to take effect, export and start NFS service.
sudo exportfs -a
sudo /etc/init.d/nfs-kernel-server start
Now your PXE Server is ready.
A PXE client can be any computer system with a PXE network boot enable option. Now your clients can boot and install Ubuntu 14.04 Desktop by enabling “Boot From Network” options from their systems BIOS.
You’re now ready to go – start your PXE Client Machine with the network boot enable option, and you should now see a sub-menu showing for your Ubuntu 14.04 Desktop that we created.
pxe
Configuring network boot installation using PXE server is efficient and a time-saving method. You can install hundreds of client at a time in your local network. All you need is a PXE server and PXE enabled clients. Try it out, and let us know if this works for you.

Monday, 13 February 2017

Installing Apache2 With PHP5 And MySQL Support On Ubuntu 14.04LTS (LAMP)

Anonymous
LAMP is short for Linux, Apache, MySQL, PHP. This tutorial shows how you can install an Apache2 webserver on anUbuntu 13.04 server with PHP5 support (mod_php) and MySQL support.
I do not issue any guarantee that this will work for you!

1 Preliminary Note

In this tutorial I use the hostname server1.example.com with the IP address 192.168.0.100. These settings might differ for you, so you have to replace them where appropriate.
I'm running all the steps in this tutorial with root privileges, so make sure you're logged in as root:
sudo su

2 Installing MySQL 5

First we install MySQL 5 like this:
apt-get install mysql-server mysql-client
You will be asked to provide a password for the MySQL root user - this password is valid for the user root@localhost as well as root@server1.example.com, so we don't have to specify a MySQL root password manually later on:
New password for the MySQL "root" user: <-- yourrootsqlpassword
Repeat password for the MySQL "root" user: <-- yourrootsqlpassword

3 Installing Apache2

Apache2 is installed by default in ubuntu14.04, If not installed then install it. Apache2 is available as an Ubuntu package, therefore we can install it like this:
apt-get install apache2
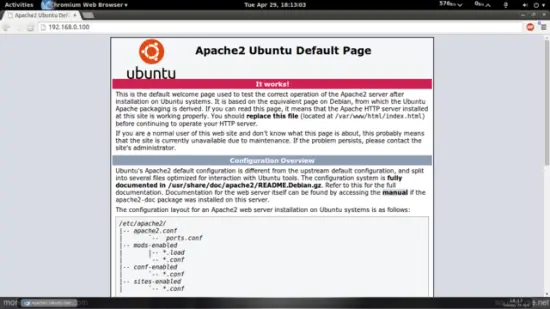
Now direct your browser to http://192.168.0.100, and you should see the Apache2 placeholder page (It works!):
Apache's default document root is /var/www/html on Ubuntu, and the configuration file is /etc/apache2/apache2.conf. The configuration system is fully documented in /usr/share/doc/apache2/README.Debian.gz

4 Installing PHP5

We can install PHP5 and the Apache PHP5 module as follows:
apt-get install php5 libapache2-mod-php5
We must restart Apache afterwards:
service apache2 restart

5 Testing PHP5 / Getting Details About Your PHP5 Installation

The document root of the default web site is /var/www/html. We will now create a small PHP file (info.php) in that directory and call it in a browser. The file will display lots of useful details about our PHP installation, such as the installed PHP version.
vi /var/www/html/info.php
<?php
phpinfo();
?>
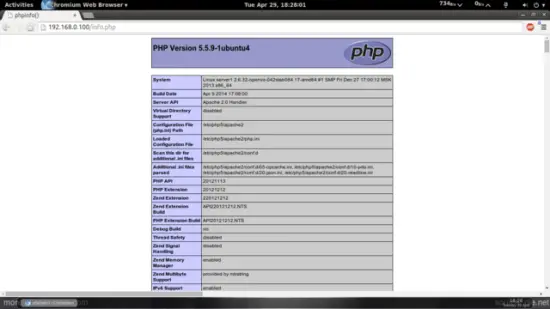
Now we call that file in a browser (e.g. http://192.168.0.100/info.php):
As you see, PHP5 is working, and it's working through the Apache 2.0 Handler, as shown in the Server API line. If you scroll further down, you will see all modules that arealready enabled in PHP5. MySQL is not listed there which means we don't have MySQL support in PHP5 yet.

6 Getting MySQL Support In PHP5

To get MySQL support in PHP, we can install the php5-mysql package. It's a good idea to install some other PHP5 modules as well asyou might need them for your applications. You can search for available PHP5 modules like this:
apt-cache search php5
Pick the ones you need and install them like this:
apt-get install php5-mysql php5-curl php5-gd php5-intl php-pear php5-imagick php5-imap php5-mcrypt php5-memcache php5-ming php5-ps php5-pspell php5-recode php5-snmp php5-sqlite php5-tidy php5-xmlrpc php5-xsl
Now restart Apache2:
service apache2 restart
Xcache is a free and open PHP opcode cacher for caching and optimizing PHP intermediate code. It's similar to other PHP opcode cachers, such as eAccelerator and APC. It is strongly recommended to have one of these installed to speed up your PHP page.
Xcache can be installed as follows:
apt-get install php5-xcache
Now restart Apache:
service apache2 restart
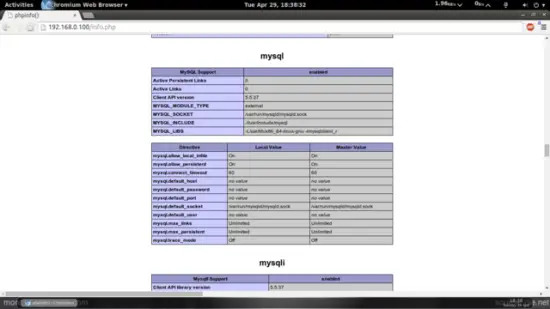
Now reload http://192.168.0.100/info.php in your browser and scroll down to the modules section again. You should now find lots of new modules there, including the MySQL module:

7 phpMyAdmin

phpMyAdmin is a web interface through which you can manage your MySQL databases. It's a good idea to install it:
apt-get install phpmyadmin
You will see the following questions:
Web server to reconfigure automatically: <-- apache2
Configure database for phpmyadmin with dbconfig-common? <-- No
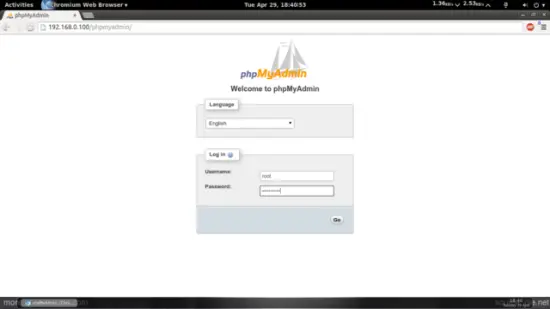
Afterwards, you can access phpMyAdmin under http://192.168.0.100/phpmyadmin/:

Thursday, 9 February 2017

How to Install Gitlab on CentOS/RHEL 5/6/7

Harry
GitLab is a web-based Git repository manager and issue tracking features. GitLab is similar to GitHub, but GitLab has an open source version, unlike GitHub. Git repository management, code reviews, issue tracking, activity feeds and wikis. It comes with GitLab CI for continuous integration and delivery.


This article will help you to install Gitlab on CentOS/RHEL using Omnibus install method. The Omnibus project is a full-stack platform-specific solution.

Step 1: Install and Configure the necessary dependencies

You need to configure mail service on our server. We can use any mail service like postfix, sendmail, exim etc. In this article I am using postfix email service.
# yum install postfix 
# service postfix start
# chkconfig postfix on
# lokkit -s http -s ssh

Step 2: Install other dependencies

Now you need to install other dependencies packages. You following command to install dependencies:
# yum install curl openssh-server cronie

Step 3: Install GitLab package on Server

Use following command to install GitLab packages on server.
# curl https://packages.gitlab.com/install/repositories/gitlab/gitlab-ce/script.rpm.sh | # bash
# yum install gitlab-ce
If you are not comfortable installing the repository through a piped script, you can find the entire script here.

Step 4: Change External URl

If you want to change the external url the use follow below steps:
# vim /etc/gitlab/gitlab.rb
external_url 'http://host.domain.com'

Step 5: Configure GitLab on Server

# gitlab-ctl reconfigure

Step 6: Acces and login GitLab

You can browse GitLab from your browser using server IP or hostname. Use below details to login in GitLab:
http://192.168.10.55
or
http://hostname
Username: root 
Password: 5iveL!fe
gitlab
gitlab1
Note: If you do any changes in configuration file than you need to run reconfigure command to make the changes.Use following command to reconfigure:
# gitlab-ctl reconfigure

GitLab Detail:

Main Configuration File: /var/opt/gitlab/gitlab-rails/etc/gitlab.yml
GitLab Document Root: /opt/gitlab
Default Repository Location: /var/opt/gitlab/git-data/repositories
Default Nginx Configuration File: /opt/gitlab/embedded/conf/nginx.conf
GitLab Nginx Configuration file Location: /var/opt/gitlab/nginx/conf
Postgresql data Directory: /var/opt/gitlab/postgresql/data

Monday, 6 February 2017

How to change XAMPP Apache port

Harry

About XAMPP

XAMPP is a free and open source cross-platform web server solution stack package, consisting mainly of the Apache HTTP Server, MySQL database, and interpreters for scripts written in the PHP and Perl programming languages.
The program is released under the terms of the GNU General Public License and acts as a free web server capable of serving dynamic pages. XAMPP is available for Microsoft Windows, Linux, Solaris, and Mac OS X, and is mainly used for web development projects. This software is useful while you are creating dynamic webpages using programming languages like PHP, JSP, Servlets.

Why to change default Apache port in XAMPP

If you are a developer or a QA and you want to use XAMPP it is great probability that port 80 is already in use by some other application, or maybe blocked by an administrator.
In order to avoid problems, change Apache port in XAMPP to some other value, e.g. 8080
Consider that regardless of which port you specify Apache to listen to, the XAMPP Control Panel will always display:
"Apache started [Port 80]"


  How to change Apache port in XAMPP

1) Open xampp/apache/conf/http.conf
2) Find a line "Listen 80"
3) Change port from default 80 to e.g. 8080
4) Then search for the string “ServerName” and update the port number there also. Find a line:
"ServerName localhost:80"
5) Change it to e.g. localhost:8080
6) Save the file
7) Restart XAMPP server


  How to use new port in XAMPP Apache

Let's say that your machine is localhost, so in that case you only need to add port number at the end in browser's addressbar, e.g.:
http://localhost:8080


If you like the article please share it with others!

Thursday, 2 February 2017

Git Cheatsheet

Anonymous


Git is one of the, if the not the, most popular version control systems available. Originally created by Linus Torvalds to help manage the Linux source code, it's now used by millions of projects across all languages.

Trying to remember all those commands to perform common git tasks can be a bit of a nightmare, so we've created this Git cheat sheet of the most common commands so you can print it out as a quick reference to have at your desk.

Creating Repositories


# create new repository in current directory
git init

# clone a remote repository
git clone [url]
# for example cloning the entire jquery repo locally
git clone https://github.com/jquery/jquery

Branches and Tags


# List all existing branches with the latest commit comment 
git branch –av

# Switch your HEAD to branch
git checkout [branch]

# Create a new branch based on your current HEAD
git branch [new-branch]

# Create a new tracking branch based on a remote branch
git checkout --track [remote/branch]
# for example track the remote branch named feature-branch-foo
git checkout --track origin/feature-branch-foo

# Delete a local branch
git branch -d [branch]

# Tag the current commit
git tag [tag-name]

Local Changes


# List all new or modified files - showing which are to staged to be commited and which are not 
git status

# View changes between staged files and unstaged changes in files
git diff

# View changes between staged files and the latest committed version
git diff --cached
# only one file add the file name
git diff --cached [file]

# Add all current changes to the next commit
git add [file]

# Remove a file from the next commit
git rm [file]

# Add some changes in < file> to the next commit
# Watch these video's for a demo of the power of git add -p - http://johnkary.net/blog/git-add-p-the-most-powerful-git-feature-youre-not-using-yet/
git add -p [file]

# Commit all local changes in tracked  files
git commit –a
git commit -am "An inline  commit message"

# Commit previously staged changes
git commit
git commit -m "An inline commit message"

# Unstages the file, but preserve its contents

git reset [file]

Commit History


# Show all commits, starting from the latest 
git log 

# Show changes over time for a specific file 
git log -p [file]

# Show who changed each line in a file, when it was changed and the commit id
git blame -c [file]

Update and Publish


# List all remotes 
git remote -v

# Add a new remote at [url] with the given local name
git remote add [localname] [url]

# Download all changes from a remote, but don‘t integrate into them locally
git fetch [remote]

# Download all remote changes and merge them locally
git pull [remote] [branch]

# Publish local changes to a remote 
git push [remote] [branch]

# Delete a branch on the remote 
git branch -dr [remote/branch]

# Publish your tags to a remote
git push --tags

Merge & Rebase


# Merge [branch] into your current HEAD 
git merge [branch]

# Rebase your current HEAD onto [branch]
git rebase [branch]

# Abort a rebase 
git rebase –abort

# Continue a rebase after resolving conflicts 
git rebase –continue

# Use your configured merge tool to solve conflicts 
git mergetool

# Use your editor to manually solve conflicts and (after resolving) mark as resolved 
git add <resolved- file>
git rm <resolved- file>

Undo


# Discard all local changes and start working on the current branch from the last commit
git reset --hard HEAD

# Discard local changes to a specific file 
git checkout HEAD [file]

# Revert a commit by making a new commit which reverses the given [commit]
git revert [commit]

# Reset your current branch to a previous commit and discard all changes since then 
git reset --hard [commit]

# Reset your current branch to a previous commit and preserve all changes as unstaged changes 
git reset [commit]

#  Reset your current branch to a previous commit and preserve staged local changes 
git reset --keep [commit]

Git Tutorial: 10 Common Git Problems and How to Fix Them

Anonymous


Learning Git?  This Git tutorial covers the 10 most common Git tricks you should know about: how to undo commits, revert commits, edit commit messages, discard local files, resolve merge conflicts, and more.

1. Discard local file modifications

Sometimes the best way to get a feel for a problem is diving in and playing around with the code. Unfortunately, the changes made in the process sometimes turn out to be less than optimal, in which case reverting the file to its original state can be the fastest and easiest solution:
  git checkout -- Gemfile  # reset specified path
  git checkout -- lib bin  # also works with multiple arguments  
In case you’re wondering, the double dash (--) is a common way for command line utilities to signify the end of command options.

2. Undo local commits

Alas, sometimes it takes us a bit longer to realize that we are on the wrong track, and by that time one or more changes may already have been committed locally. This is when git reset comes in handy:
  git reset HEAD~2        # undo last two commits, keep changes
  git reset --hard HEAD~2 # undo last two commits, discard changes  
Be careful with the --hard option! It resets your working tree as well as the index, so all your modifications will be lost for good.

3. Remove a file from git without removing it from your file system

If you are not careful during a git add, you may end up adding files that you didn’t want to commit. However, git rm will remove it from both your staging area, as well as your file system, which may not be what you want. In that case make sure you only remove the staged version, and add the file to your .gitignore to avoid making the same mistake a second time:
  git reset filename          # or git remove --cached filename
  echo filename >> .gitingore # add it to .gitignore to avoid re-adding it  

4. Edit a commit message

Typos happen, but luckily in the case of commit messages, it is very easy to fix them:
  git commit --amend                  # start $EDITOR to edit the message
  git commit --amend -m "New message" # set the new message directly
But that’s not all git-amend can do for you. Did you forget to add a file? Just add it and amend the previous commit!
  git add forgotten_file
  git commit --amend
Please keep in mind that --amend actually will create a new commit which replaces the previous one, so don’t use it for modifying commits which already have been pushed to a central repository. An exception to this rule can be made if you are absolutely sure that no other developer has already checked out the previous version and based their own work on it, in which case a forced push (git push --force) may still be ok. The --force option is necessary here since the tree’s history was locally modified which means the push will be rejected by the remote server since no fast-forward merge is possible.

5. Clean up local commits before pushing

While --amend is very useful, it doesn’t help if the commit you want to reword is not the last one. In that case an interactive rebase comes in handy:
  git rebase --interactive
  # if you didn't specify any tracking information for this branch
  # you will have to add upstream and remote branch information:
  git rebase --interactive origin branch  
This will open your configured editor and present you with the following menu:
  pick 8a20121 Upgrade Ruby version to 2.1.3
  pick 22dcc45 Add some fancy library

  # Rebase fcb7d7c..22dcc45 onto fcb7d7c
  #
  # Commands:
  #  p, pick = use commit
  #  r, reword = use commit, but edit the commit message
  #  e, edit = use commit, but stop for amending
  #  s, squash = use commit, but meld into previous commit
  #  f, fixup = like "squash", but discard this commit's log message
  #  x, exec = run command (the rest of the line) using shell
  #
  # These lines can be re-ordered; they are executed from top to bottom.
  #
  # If you remove a line here THAT COMMIT WILL BE LOST.
  #
  # However, if you remove everything, the rebase will be aborted.
  #
  # Note that empty commits are commented out
On top you’ll see a list of local commits, followed by an explanation of the available commands. Just pick the commit(s) you want to update, change pick to reword (or r for short), and you will be taken to a new view where you can edit the message.
However, as can be seen from the above listing, interactive rebases offer a lot more than simple commit message editing: you can completely remove commits by deleting them from the list, as well as edit, reorder, and squash them. Squashing allows you to merge several commits into one, which is something I like to do on feature branches before pushing them to the remote. No more “Add forgotten file” and “Fix typo” commits recorded for eternity!

6. Reverting pushed commits

Despite the fixes demonstrated in the previous tips, faulty commits do occasionally make it into the central repository. Still this is no reason to despair, since git offers an easy way to revert single or multiple commits:
  git revert c761f5c              # reverts the commit with the specified id
  git revert HEAD^                # reverts the second to last commit
  git revert develop~4..develop~2 # reverts a whole range of commits
In case you don’t want to create additional revert commits but only apply the necessary changes to your working tree, you can use the --no-commit/-n option.
  # undo the last commit, but don't create a revert commit
  git revert -n HEAD
The manual page at man 1 git-revert list further options and provides some additional examples.

7. Avoid repeated merge conflicts

As every developer knows, fixing merge conflicts can be tedious, but solving the exact same conflict repeatedly (e.g. in long running feature branches) is outright annoying. If you’ve suffered from this in the past, you’ll be happy to learn about the underused reuse recorded resolution feature. Add it to your global config to enable it for all projects:
  git config --global rerere.enabled true
Alternatively you can enable it on a per-project basis by manually creating the directory .git/rr-cache.
This sure isn’t a feature for everyone, but for people who need it, it can be real time saver. Imagine your team is working on various feature branches at the same time. Now you want to merge all of them together into one testable pre-release branch. As expected, there are several merge conflicts, which you resolve. Unfortunately it turns out that one of the branches isn’t quite there yet, so you decide to un-merge it again. Several days (or weeks) later when the branch is finally ready you merge it again, but thanks to the recorded resolutions, you won’t have to resolve the same merge conflicts again.
The man page (man git-rerere) has more information on further use cases and commands (git rerere status, git rerere diff, etc).

8. Find the commit that broke something after a merge

Tracking down the commit that introduced a bug after a big merge can be quite time consuming. Luckily git offers a great binary search facility in the form of git-bisect. First you have to perform the initial setup:
  git bisect start         # starts the bisecting session
  git bisect bad           # marks the current revision as bad
  git bisect good revision # marks the last known good revision
After this git will automatically checkout a revision halfway between the known “good” and “bad” versions. You can now run your specs again and mark the commit as “good” or “bad” accordingly.
  git bisect good # or git bisec bad
This process continues until you get to the commit that introduced the bug.

9. Avoid common mistakes with git hooks

Some mistakes happen repeatedly, but would be easy to avoid by running certain checks or cleanup tasks at a defined stage of the git workflow. This is exactly the scenario that hooks were designed for. To create a new hook, add an executable file to .git/hooks. The name of the script has to correspond to one of the available hooks, a full list of which is available in the manual page (man githooks). You can also define global hooks to use in all your projects by creating a template directory that git will use when initializing a new repository (see man git-init for further information). Here’s how the relevant entry in ~/.gitconfig and an example template directory look like:
  [init]
    templatedir = ~/.git_template


  → tree .git_template
  .git_template
  └── hooks
      └── pre-commit  
When you initialize a new repository, files in the template directory will be copied to the corresponding location in your project’s .git directory.
What follows is a slightly contrived example commit-msg hook, which will ensure that every commit message references a ticket number like “#123“.
  ruby
  #!/usr/bin/env ruby
  message = File.read(ARGV[0])

  unless message =~ /\s*#\d+/
    puts "[POLICY] Your message did not reference a ticket."
    exit 1
  end

10. When all else fails

So far we covered quite a lot of ground on how to fix common errors when working with git. Most of them have easy enough solutions, however there are times when one has to get out the big guns and rewrite the history of an entire branch. One common use case for this is removing sensitive data (e.g. login credentials for production systems) that were committed to a public repository:
  git filter-branch --force --index-filter \
  'git rm --cached --ignore-unmatch secrets.txt' \
  --prune-empty --tag-name-filter cat -- --all
This will remove the file secrets.txt from every branch and tag. It will also remove any commits that would be empty as a result of the above operation. Keep in mind that this will rewrite your project’s entire history, which can be very disruptive in a distributed workflow. Also while the file in question has now been removed, the credentials it contained should still be considered compromised!

Wednesday, 25 January 2017

How to Configure MongoDB with PHP for XAMPP on Windows

Anonymous
XAMPP is an open source, easy to use and easy to install stack that contains Apache webserver, MySQL database, PHP compiler and Perl.
MongoDB is one of the most widely NoSQL database in market today. We often end up in a situation where we might find it useful to set up mongodb also along with PHP in the XAMPP stack.
Since mongoDB is not an integral part of this stack, we have to set it up manually as the XAMPP installer is not going to take care of it for you.

Follow the steps below to configure MongoDB for the XAMPP stack.

1. Install and Configure XAMPP

First, you should install the XAMPP stack. Download and install the XAMPP stack from Apache friends project.
Also, keep in mind that you can also install XAMPP on Linux as we discussed earlier.
After the install, start your Apache server from XAMPP controls and create a simple PHP file to get the detailed info about the PHP running with your stack. Just copy paste the below lines to a test.php file in the htdocs folder and execute it to see the output.
<?php
 echo phpinfo();
?>
As highlighted in the screenshot below, you will find the PHP version, Architecture, Compiler in use and can see whether thread safety is enabled or not.
XAMPP phpinfo

2. Download PHP Mongo Driver

From this PHP Mongo Driver download page, download the appropriate file that matches the PHP version, Architecture, Compiler in use and Thread Safety from the XAMPP that is installed on your system.

3. Copy PHP Mongo DDL to EXT Directory

After you unzip the php monngo driver zip file, copy and paste the “.dll” file to the folder “C:\xampp\php\ext”( Assuming that xampp is installed on C drive).
This ext folder all the “.dll” files of all the extensions that are installed. XAMPP loads the driver files for the extensions from this folder.
After copying the file over here, rename the “.dll” file to “php_mongo.dll” for simplicity.

4. Add Extension to php.ini

Next, open the “php.ini” file from the path “C:\xampp\php” (again, assuming that xampp is installed on C drive), and edit this file to add the name of the “.dll” file as an extension.
Add the following line to the php.ini file.
extension=php_mongo.dll
Later, if you like, you can also disable this extension by adding a semicolon before the line so that it becomes as shown below:
;extension=php_mongo.dll

5. Modify the PATH Variable

Go to control panel, and open the system settings to add the “Environment Variable”.
Add the path of the xampp php installation ( C:\xampp\php ) to the path variable, if it is not present already. This ensures that the newly added “.dll” file is loaded when xampp is started.
XAMPP Add to PATH

6. Restart Apache and Verify

Finally, restart the Apache server from the XAMPP control panel.
If everything is configured properly, xampp should not throw any error messages while starting apache. You can also check the loaded extension by going through the first step and looking into the php information.
You will be able to see the loaded extension information on the page as shown below.
XAMPP phpinfo with Mongo Support

Sunday, 22 January 2017

How to Use Git Step by Step using Command line

Anonymous
For Example :  I am a developer  and my git Details is below.
User name : Harry
User Email : Harry@India.com ( Git Email)
Lets suppose I want to  work on TicketTool Branch. So TicketTool branch is live for me. I should not Modified TicketTool Files Directly. So We have to Create local Branch from TicketTool. Here we have created local branch issue-2 from TicketTool. Now we can modify any files in my local Branch( issue-2).
 Live Branch :-  TicketTool.
Local Branch:-  issue-2
If you want to initialize new clone/ Project Follow bellow Command.
 #Git global setup ( one Time only)
 git config --global user.name "Hari"
 git config --global user.email "Harry@india.com"
 git clone  http://ubuntu/harry/itsupport.git   // project url
  cd  MyProject    // project folder
   
# This command will use many times.
    git checkout TicketTool            // live Branch
    git pull            // Pull for latest update.   
    git checkout issue-2     // Working branch / local Branch.
    git merge TicketTool      // if your local live branch is already uptodated. Then Not Required.


//After Completing above 4 Command now we can start our work. When our work will done. Then we have to Run below commands.

    git add *   // mark all changes for commit
    git commit  // commit / save  project changes on your local machine.


// if you run above Two commands it means your Work is Committed ( Saved)  on your local system. but we have to push our work on git server. So we have to follow below commands once more.

    git checkout TicketTool                           
    git pull
    git checkout issue-2     // Working branch
    git merge TicketTool


// above 4 commands are used for taking latest update and merge into our local branch ( issue2).   Finaly here  is command to Push our work on git Server.

    git push issue-2

if you have pushed  your work successfully  on git server . now create merge request from web login. ( if required)

Saturday, 21 January 2017

How To Install gFTP 2.0.19 On Ubuntu 14.10, Ubuntu 14.04, Ubuntu 12.04 And Derivative Systems

Harry
Hello Linux Geeksters. As you may know, gFTP is an open-source, multi-threaded ftp client developed for Linux and Unix systems.
The latest version available is gFTP 2.0.19, which has the below features:
  • Distributed under the terms of the GNU Public License Agreement
  • Written in C and has a text interface and a GTK+ 1.2/2.x interface
  • Supports the FTP, FTPS (control connection only), HTTP, HTTPS, SSH and FSP protocols
  • FTP and HTTP proxy server support
  • Supports FXP file transfers (transferring files between 2 remote servers via FTP)
  • Supports UNIX, EPLF, Novell, MacOS, VMS, MVS and NT (DOS) style directory listings
  • Bookmarks menu to allow you to quickly connect to remote sites
how to install gFTP 2.0.19 on Ubuntu 14.10 Utopic Unicorn, Ubuntu 14.04 Trusty Tahr, Ubuntu 12.04 Precise Pangolin, Linux Mint 17.1 Rebecca, Linux Mint 17 Qiana, Linux Mint 13 Maya, Pinguy OS 14.04, Elementary OS 0.3 Freya, Elementary OS 0.2 Luna, Deepin 2014, Peppermint Five, LXLE 14.04, Linux Lite 2.0
In this article I will show you how to install gFTP 2.0.19 on Ubuntu 14.10 Utopic Unicorn, Ubuntu 14.04 Trusty Tahr, Ubuntu 12.04 Precise Pangolin, Linux Mint 17.1 Rebecca, Linux Mint 17 Qiana, Linux Mint 13 Maya, Pinguy OS 14.04, Elementary OS 0.3 Freya, Elementary OS 0.2 Luna, Deepin 2014, Peppermint Five, LXLE 14.04, Linux Lite 2.0 and other Ubuntu 14.10, Ubuntu 14.04, Ubuntu 12.04 and derivative systems.
Because it is available via PPA, installing gFTP 2.0.19 on Ubuntu 14.10, Ubuntu 14.04, Ubuntu 12.04 and derivative systems is easy. All you have to do is add the ppa to your system, update the local repository index and install the gftp package. Like this:
$ sudo add-apt-repository ppa:klaus-vormweg/ppa
$ sudo apt-get update
$ sudo apt-get install gftp

Optinal, to remove gftp, do:
$ sudo apt-get remove gftp

Wednesday, 18 January 2017

Using wget To Download Entire Websites

Anonymous
Basic wget Commands:
To download a file from the Internet type:

wget http://www.example.com/downloads.zip

If you are downloading a large file, for example an ISO image, this could take some time. If your Internet connection goes down, then what do you do? You will have to start the download again. If you are downloading a 700Mb ISO image on a slow connection, this could be very annoying! To get around this problem, you can use the -c parameter. This will continue the download after any disruptions. eg:
wget -c http://www.example.com/linux.iso

I have came across some websites that do not allow you to download any files using a download manager. To get around this,
wget -U mozilla http://www.example.com/image.jpg

This will pass wget off as being a Mozilla web browser

Downloading Entire Sites:
Wget is also able to download an entire website. But because this can put a heavy load upon the server, wget will obey the robots.txt file.
wget -r -p http://www.example.com

The -p parameter tells wget to include all files, including images. This will mean that all of the HTML files will look how they should do.

So what if you don't want wget to obey by the robots.txt file? You can simply add -e robots=off to the command like this:
wget -r -p -e robots=off http://www.example.com


As many sites will not let you download the entire site, they will check your browsers identity. To get around this, use -U mozilla as I explained above.
wget -r -p -e robots=off -U mozilla http://www.example.com

A lot of the website owners will not like the fact that you are downloading their entire site. If the server sees that you are downloading a large amount of files, it may automatically add you to it's black list. The way around this is to wait a few seconds after every download. The way to do this using wget is by including --wait=X (where X is the amount of seconds.)

you can also use the parameter: --random-wait to let wget chose a random number of seconds to wait. To include this into the command:
wget --random-wait -r -p -e robots=off -U mozilla http://www.example.com


Other Useful wget Parameters:
--limit-rate=20k : Limits the rate at which it downloads files. (20Kb/s)
-b : Continues wget after logging out. Very useful if you are connecting to your home PC via SSH.
-o $HOME/wget_log.txt : Logs the output of the wget command to a text file within your home directory. Useful for if you are using wget in the background, as you can check for any errors that may appear

Install XAMPP 7.0 on Ubuntu and Mac OSx using Redis and Memcached Extensions

Anonymous
Now, it’s time to update your PHP web server. We had few vulnerabilities with previous versions like openSSL and others. PHP 7 is very fast, advanced and has improved execution time. XAMPP is the most popular PHP development environment, it saves time and effort by providing easy way to install Apache-MySQL-PHP framework. This post helps you how to install XAMPP 7.0 with Redis and memcached extensions for Ubuntu and Mac operating systems. Follow the below steps to install XAMPP.


XAMPP 7.0.3 Installation Commands for Ubuntu and Mac

Download XAMPP 7.0.3 for 64 bit
wget https://www.apachefriends.org/xampp-files/7.0.13/xampp-linux-x64-7.0.13-0-installer.run

For Mac OS you can download XAMPP 7.0.3 directly.

Make Execute Installation
sudo chmod +x xampp-linux-x64-7.0.13-0-installer.run

Run Installation
sudo ./xampp-linux-x64-7.0.13-0-installer.run

XAMPP instructions
Select the components you want to install; clear the components you do not want to install. Click Next when you are ready to continue.
XAMPP Core Files : Y (Cannot be edited)
XAMPP Developer Files [Y/n] : Y
Is the selection above correct? [Y/n]: Y

Installation Directory
XAMPP will be installed to /opt/lampp
Press [Enter] to continue:
Do you want to continue? [Y/n]:Y

Run XAMPP
sudo /opt/lampp/lampp start

XAMPP Access Forbidden
Open your browser and access http://IP-ADDRESS/ you will find this Access forbidden screen.
Launch instance

XAMPP Configurations
Edit XAMPP configurations.
vi /opt/lampp/etc/extra/httpd-xampp.conf

Replace following line Require all granted
<Directory "/opt/lampp/phpmyadmin">
    AllowOverride AuthConfig Limit
    Require all granted
    ErrorDocument 403 /error/XAMPP_FORBIDDEN.html.var
</Directory>

Security Settings for PhpMyAdmin
sudo /opt/lampp/xampp security

Follow this instructions.
XAMPP: Your XAMPP pages are NOT secured by a password.
XAMPP: Do you want to set a password? [yes] no
XAMPP: MySQL is accessable via network.
XAMPP: Normaly that's not recommended. Do you want me to turn it off? [yes] yes
XAMPP: Turned off.
XAMPP: Stopping MySQL...ok.
XAMPP: Starting MySQL...ok.
XAMPP: The MySQL/phpMyAdmin user pma has no password set!!!
XAMPP: Do you want to set a password? [yes] yes
XAMPP: Password:*******
XAMPP: Password (again):*******
XAMPP: Setting new MySQL pma password.
XAMPP: Setting phpMyAdmin's pma password to the new one.
XAMPP: MySQL has no root passwort set!!!
XAMPP: Do you want to set a password? [yes] yes
XAMPP: Write the password somewhere down to make sure you won't forget it!!!
XAMPP: Password:*******
XAMPP: Password (again):*******
XAMPP: Setting new MySQL root password.
XAMPP: Change phpMyAdmin's authentication method.
XAMPP: The FTP password for user 'daemon' is still set to 'xampp'.
XAMPP: Do you want to change the password? [yes] no
XAMPP: Done.

PhpMyAdmin
You can access PhyMyAdmin at http://IP-Address/phpmyadmin/
Launch instance

Enable Redis Extension for XAMPP 7.0 on Ubuntu

Download PHP 7.0 dev and execute following commands
$ apt-get install php7.0-dev
$ wget https://github.com/phpredis/phpredis/archive/php7.zip -O phpredis-php7.zip
apt-get install unzip
$ unzip phpredis-php7.zip
$ cd phpredis-php7
$ phpize
$ ./configure
$ make
$ make install

Now go to modules folder inside phpredis-php7 folder.
$ cd modules

Copy redis.so extension file in XAMPP extensions folder. Replace XXXXXX with your folder number.
$ cp redis.so /opt/lampp/lib/php/extensions/no-debug-non-zts-XXXXXXX/

Now edit php.ini.
$ vi /opt/lampp/etc/php.ini

Include following line and save.
extension="redis.so"

Restart server.
sudo /opt/lampp/lampp restart

Enable Redis Extension for XAMPP 7.0 on Mac OSx
Install php 7.0 dev and Redis.
$ brew install homebrew/php/php70
$ brew install homebrew/php/php70-redis

Copy redis.so extension file into Xampp PHP extensions.
$ sudo cp /urs/local/Cellar/php70-redis/3.0.0/redis.so /user/username/Applications/XAMPP/xamppfiles/lib/php/extensions/no-debug-non-zts-XXXXXXX/

Edit php.ini file with text editor.
$ vi /users/username/Applications/XAMPP/xamppfiles/etc/php.ini

Include following line and restart XAMPP Server.
extension="redis.so"

Install Redis Server for Mac and Ubuntu

Download Redis server and execute following commands
$ wget http://download.redis.io/releases/redis-2.8.3.tar.gz
$ tar xzf redis-2.8.3.tar.gz
$ cd redis-2.8.3
$ make

Start Redis Server.
$ src/redis-server


Enable Memcached Extension for XAMPP 7.0 on Ubuntu

$ sudo apt-get install -y php7.0-dev git pkg-config build-essential libmemcached-dev

$ git clone https://github.com/php-memcached-dev/php-memcached.git

$ cd php-memcached

$ git checkout php7
$ phpize
$ ./configure --disable-memcached-sasl
$ make
$ sudo make install

Copy memcached.so extension into XAMPP extensions folder, replace XXXXX with your folder directory name.
$ cp /usr/lib/php/20151012/memcached.so /opt/lampp/lib/php/extensions/no-debug-non-zts-XXXXXX/

Edit PHP.ini
$ vi /opt/lampp/etc/php.ini

Enable Memchached extension.
extension="memcached.so"


Enable Memcached Extension for XAMPP 7.0 on Mac OSx

$ brew install --HEAD homebrew/php/php70-memcached

$ cp /urs/local/Cellar/php70-memcached/HEAD-e65be32/memcached.so /user/username/Applications/XAMPP/xamppfiles/lib/php/extensions/no-debug-non-zts-XXXXXXX/

$ vi /users/username/Applications/XAMPP/xamppfiles/etc/php.ini

extension="memcached.so"

Memcached Server for Ubuntu
$ apt-get install memcached
$ service memcached restart

Memcached Server for Mac
Download Memcached Server and extract with ZIP software.

$ cd memcached-1.4.15
$ ./configure

$ make
$ sudo make install
$ memcached

Memcached listens on port 11211 by default, to change it, use the -p option.
$ memcached -p 8000